
Robots
Problem:
Create a competitive swerve drivetrain suitable for robotics competitions and general robotic assistance tasks that maintains low power draw, is simple to maintain, and uses cheaper, widely available parts than traditional swerve systems. Most conventional swerve systems rely on expensive components, complex mechanics, and high current demands.
Method:
Designed a custom Kiwi swerve drivetrain using three modules instead of four, reducing system complexity, cost, and power consumption.
Eliminated one drive motor and one steering actuator compared to traditional four-module swerves.
Implemented continuous rotation (CR) servos for steering paired with external encoders instead of positional servos.
Used encoder based absolute angle feedback to allow CR servos to function as precision steering motors through software control.
Maintained perfect chassis symmetry, critical for stable motion and accurate kinematics in a three module swerve system.
Built a custom electronics stack, including:
Raspberry Pi running Python.
10-amp motor drivers for drive motors.
12-bit encoder board for high-resolution steering feedback.
Servo HAT for CR servo control.
Developed custom control software entirely in Python handling:
Kiwi swerve kinematics.
Closed-loop steering control using encoder feedback
Power-efficient motor output scaling.
Real-time synchronization between steering and drive systems.
Result:
Significantly reduced cost by replacing traditional steering motors with CR servos and encoders.
Lower overall power draw due to fewer motors and optimized power distribution.
Achieved full omnidirectional movement with fewer mechanical components.
Simplified maintenance through use of generic, widely available parts.
Increased reliance on software precision and encoder calibration, enabling flexibility and rapid iteration.
Demonstrated a practical, efficient, and accessible swerve drivetrain suitable for both competitive robotics and assistive robotic applications.
Click the photo to find out more!
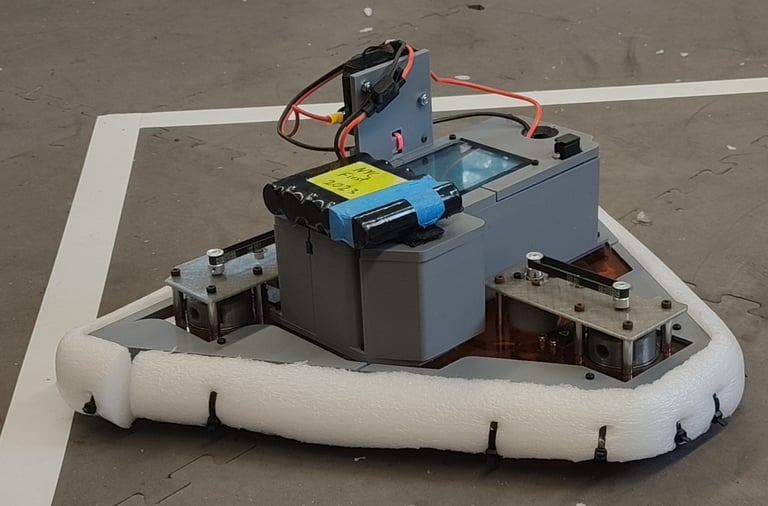

Dorito Custom Swerve Drive

Problem:
Make compact and affordable swerve drivetrain modules for FTC robots, since traditional pods are too big and too expensive for most teams.
Method:
Designed first prototype under 4in × 4in × 4in using 3D-printed structural parts to hold shafts, gears, and bearings.
Manufactured and assembled a full drivetrain using four pods (1 motor + 1 servo per pod).
Evaluated costs and mechanical performance.
Created a second prototype with changes:
Switched to generic parts from Amazon/AliExpress to reduce cost.
Increased module height by < ¼ inch.
Changed module shape from L-shaped to rectangle.
Updated hole pattern to fit Gobilda, REV, and Andymark build systems.
Result:
First prototype worked mechanically but was too expensive (~$350 per pod, ~$1300 for a full chassis).
Second prototype reduced cost and improved compatibility, making it more realistic for teams to use.
Project is ongoing — aim is to create a drivetrain that is both affordable and competitive for FTC teams worldwide.
Click the photo to find out more!


Coaxial Swerve
Problem:
Build a lifelike, voice-activated AI assistant that can recognize speech, respond intelligently, and display natural eye movements with minimal noise interference.
Method:
Eyeball mechanism:
Designed the eye so servos are hidden inside.
One servo pivots the eye up/down; a second rotates the first mount for left/right motion.
Entire system mounted to a bolt on a spare monitor arm.
Upper eyelid:
Located mounting holes on the arm and designed a pivot mount.
Connected servo horn to eyelid via linkage.
Reinforced the mount after initial design broke under stress.
Both eyelids:
Lower eyelid pivot point made 5 mm thicker for durability.
Added slot for upper eyelid to slide into (both pivot on same axis).
Used longer linkage to account for servo placement.
Software integration:
Connected wake-word detection, speech recognition, and ChatGPT for conversation.
Implemented cosine-based easing for smooth servo acceleration/deceleration.
Programmed synchronized blinking and idle/listening/speaking states.
Ensured servos pause during listening to reduce microphone noise.
Result:
Created a finished AI assistant with:
Real-time speech recognition and ChatGPT responses.
Smooth, lifelike eye motion and synchronized eyelid blinking.
Ability to wake on command, hold a conversation, be interrupted mid-speech, and reset automatically.
The system successfully blends mechanical realism with intelligent voice interaction.


Click the photo to find out more!
A-Eye Animatronic Chatbot


Click the photo to find out more!
Problem:
After losing the 2023-2024 New York City FTC Championship, our team wanted redemption in an off-season event. We decided to build an entirely new swerve-drive robot—a drivetrain rarely seen in FTC because of its mechanical and programming complexity. Swerve drives retain traction while still offering omnidirectional motion, unlike mecanum or omni-wheel drives that lose grip because of their rollers.
Method:
Simple Swerve Prototype:
Studied differential swerve mechanics (two drive motors per wheel controlling both rotation + steering).
Referenced FTC 11115 Gluten-Free’s design and simplified it for cost and accessibility.
Re-engineered gearbox: replaced 3D-printed D-bore gears and set-screws with M3 × 45 mm bolts + bearings embedded in the gears for stronger alignment.
Result: cheaper, easier-to-replicate pod while preserving drivetrain geometry.
Simple Swerve V1:
Realized full pod stack was 18.25 in long, exceeding FTC 18 in limit.
Rotated motors 90° with REV Ultra 90-degree gearboxes to shorten module length.
Achieved FTC-legal chassis footprint.
Downside: added extra bevel gear pair, slightly reducing efficiency.
Simple Swerve Chassis:
Built 2-pod chassis with four corner omni-wheels for stability.
Added cutouts for linear slides to compete in an off-season event.
Event was canceled before testing, but mechanical assembly completed.
Simple Swerve V2:
Further reduced bill of materials and offered two motor configurations:
REV Ultraplanetary Motors – compact form factor, no external gearbox.
GoBilda Yellowjacket Motors – 8 mm REX shafts for durability.
Both configurations reuse the same internals; only the casing and outer plates differ.
Final version achieved smaller, cheaper, and easier-to-manufacture modules.
Result:
Completed design of a cost-efficient differential swerve module for FTC use.
Demonstrated that a reliable swerve drivetrain can be built within FTC size constraints and on a reasonable budget.
Although the chassis never competed, the project produced a working prototype that can serve as a foundation for future FTC swerve robots.
Simple Swerve
FTC Team 9384 2023 - 2024 Robot "EggWUUUHH"


Click the photo to find out more!
Problem:
Design and build a competitive FTC robot for the 2023–2024 CENTERSTAGE game, capable of scoring hexagonal pixels on a tilted backdrop, completing side-objectives like plane launching and climbing, and iterating quickly across the build season to improve performance.
Method:
September 9 – December 9 (Kickoff → Qualifier 2):
Linear Slides: Built stacked drawer-slide system with 3D printed spacers/pulleys to reach all scoring heights.
Chassis: Custom aluminum sheet chassis with mecanum drive; 4 plates parallel with cutouts and mounting holes.
Intake: 3-stage active intake (star wheels → counter rollers → zip-tie stage) for fast dual-pixel capture.
Outtake: Pixel box with 3D-printed rubber belts; struggled to score at correct angle.
Plane Launcher: Spring-powered mechanism with two servos (release + angle control).
December 9 – January 13 (Qualifier 2 → Qualifier 4):
Slides/Intake: Unchanged.
Outtake: Redesigned to pivot down and place pixels directly onto backdrop; added pinching mechanism for accuracy.
Plane Launcher/Chassis: Unchanged.
January 13 (Qualifier 4 → Super Qualifier):
Slides/Chassis/Outtake: Unchanged.
Intake: Added servo-powered pincher for autonomous pre-stacked pixels.
Plane Launcher: Same mechanism, but frame improved aesthetically.
Super Qualifier → State Championship:
Slides/Chassis/Intake/Outtake/Launcher: Unchanged.
Climber: Finalized a winch-based climber with pivoting hooks, string actuation, and passive rubber-band assist for fast, strong climbs.
Result:
Built four major robot iterations over the season.
Final robot included reliable linear slides, mecanum chassis, dual-intake, accurate backdrop outtake, spring plane launcher, and fast winch climber.
Achieved a robust, competitive design that evolved in response to weaknesses of earlier prototypes.
Engineering portfolio and CAD were finalized and published (GrabCAD + GitHub).


Problem:
Build a robot for the 2022–2023 FTC game POWERPLAY that can reliably pick up and place cones onto poles of varying heights, while being stable and efficient across multiple matches.
Method:
September 10 – December 4 (Kickoff → Qualifier 4):
Linear Slides: Used Rev Robotics linear slide kit for reach and simplicity. Intake mounted to bottom of final stage. Effective but swayed at max extension, causing cone drops.
Chassis: Simple mecanum drive on C-channels arranged in an H-pattern. Motors bolted with L-brackets. Design based on Rev Robotics Mecanum Kit.
Intake: Dual compliant wheels on servos grip cone by pinching it in the center. Worked, but struggled to keep cone secure.
December 4 – February 12 (Qualifier 4 → Super Qualifier):
Linear Slides: Same slides, but reduced gear ratio for faster lift.
Chassis: Unchanged.
Intake: Replaced wheel intake with claw-based design for reliable cone holding.
Turret: Added direct-drive turret with lazy susan bearing so robot could score on poles without turning the chassis. Shaft passed through lazy susan center — unique for FTC at the time.
February 12 – State Championship (Super Qualifier → States):
Linear Slides: Added second slider for extra rigidity, eliminating sway at max extension.
Chassis: Redesigned with bevel gearboxes so motors sat inside C-channels, lowering chassis and squaring the frame. Reinforced with extra cross beams to support larger turret.
Intake: Same claw system.
Turret: Upgraded to larger lazy susan for more surface area, allowing space for dual linear slides.
Result:
Iterated through three major designs.
Final robot had dual rigid slides, low-profile reinforced mecanum chassis, reliable claw intake, and strong turret system.
Addressed key weaknesses: stability, speed, and alignment when scoring.
Finished build season with a polished, competitive machine, documented with CAD and notebook.
Click the photo to find out more!
FTC Team 9384 2022 - 2023 Robot "Crabby"
3D Printers


Click the photo to find out more!
ZeroG Hydra
Result:
Still under development, but design already integrates:
Large build volume with CoreXY motion for balanced speed and accuracy.
Fully automated calibration through floating bed + Beacon probe.
Advanced toolhead sensors for reliable filament handling and multi-material support.
High-performance hotend/extruder combo ensuring consistent extrusion and top-tier print quality.
Aims to become a flagship quality-focused printer in your collection, complementing your other high-speed builds.
Problem:
After building multiple printers—both custom and off-the-shelf—I needed a large build volume machine that could reliably produce high-quality prints. Speed was not the focus here; the goal was a printer with advanced sensors and robust hardware to consistently output precise, strong parts.
Method:
CoreXY Motion System:
Chose CoreXY for fast, precise motion with minimal moving mass.
Two stationary motors drive X and Y axes through a belt system.
Results in lighter gantry and smoother high-speed movement.
“Floating” Bed Assembly:
Designed a 3-point, independent pivoting bed mount.
Allows automatic tramming and firmware-controlled bed leveling.
Essential for fully automated calibration before each print.
Electronics Bay:
Placed under the printer for compact design.
Includes: USB splitter, mainboard, PSU, SSR for bed heater.
SSR enables 110V bed heating for large build plate.
Runs Klipper firmware on Linux for flexible, high-performance control.
Modernized Toolhead:
Based on Filimetrix, with extensive sensor integration.
Features:
Dual filament monitoring sensors
Filament cutter knife
Eddy current bed leveling probe (Beacon)
LED indicators + touchscreen
Phaetus Rapido hotend (high flow, rapid heating)
Clockwork 2 extruder (precise filament control)
Improves usability and diagnostic feedback.
Toolhead Sensors:
Filament monitoring: Two limit switches track runout, feeding, and cutting.
Top sensor → runout + feeding detection.
Bottom sensor → confirms cut for multi-material workflows.
Beacon probe:
Magnetic/eddy current bed leveling with accelerometer function.
Provides fast, accurate meshes and nozzle-based Z-offset calibration.


Click the photos to find out more!
Delta 3D Printer
Effector V3:
Re-mounted hotend lower to reduce center of gravity.
Extruder placed just above hotend.
Redesigned ducts to concentrate airflow at nozzle tip.
Switched to detachable membrane-switch probe mounted directly on nozzle for accurate calibration.
Closed-Loop Stepper Motors:
Added encoders to stepper shafts → servo-like behavior.
Eliminated step loss, reduced resonance, smoother motion.
Used drivers mimicking A4988 to communicate with motherboard.
Touchscreen Interface:
Added TFT35 touchscreen running Klipperscreen.
Mimics full web interface, mounted on pivoting bracket above electronics box.
Result:
Built a finished delta 3D printer capable of very fast and consistent prints.
Closed-loop steppers provided reliability and accuracy.
CPAP-based cooling and direct-drive effector solved weight and extrusion issues.
Iterative effector designs improved calibration accuracy, stability, and part cooling.
End product is a unique, high-performance delta system with a custom interface and cutting-edge motion control.
Problem:
Design a high-speed, high-quality delta-style 3D printer using closed-loop steppers, a lightweight effector, and extremely strong cooling, while overcoming the complexity of delta kinematics and the challenges of weight, extrusion consistency, and airflow.
Method:
Base System:
Reused frame, PSU, and SSR bed heater from a TEVO Little Monster.
Added custom effector, closed-loop Nema 17 steppers, TFT touchscreen, and belt tensioners.
Effector V1:
Tested Bowden extruder to minimize weight.
Found long filament path caused friction → inconsistent extrusion + print artifacts.
Fan ducts failed to deliver stable airflow.
Outcome: decided to move to direct drive extruder + stronger cooling solution.
CPAP Fan Cooling:
Mounted CPAP blower to printer frame.
Routed airflow via hose to ducts at effector.
Reduced effector weight and opened up more space for hotend/extruder.
Effector V2:
Fully integrated design: ducts, hotend mount, extruder mount, bed probe mount in one part.
Added direct drive extruder for consistent extrusion.
Upgraded hotend for higher flow rate + larger melt zone.
CPAP fan cooling integrated into hotend.
Issues: probe was offset → inconsistent leveling, ducts failed to concentrate airflow.


Click the photo to find out more!
Voron V0.2990
Problem:
I wanted to build a Voron printer because of the community-driven ethos: there are no official kits, only BOMs, CAD, and manuals, which means each build is unique. After completing my machine, I quickly noticed several bottlenecks and began designing modifications to push performance further.
Method:
Custom Toolhead:
Stock Voron extruder/hotend couldn’t keep up with very high speeds (225–350 mm/s printing, 650 mm/s travel).
Designed my own toolhead with:
More powerful extruder (higher current, better grip with higher gear ratio).
Hotend with larger melt zone and optimized nozzle for higher flow rate.
Entire toolhead frame 3D printed.
Result: maintained extrusion at speeds higher than motion system’s practical limits.
Auxiliary Cooling Fan:
External 12032 grill fan for additional part cooling without adding gantry weight.
Active Carbon Filter:
5015 blower pushes chamber air through carbon filter.
Removes VOCs from toxic filament printing.
Chamber Temperature Sensor:
Reused a spare thermistor.
Mounted at top of internal frame for accurate chamber temp readings.
Camera Mount & AI Integration:
Added camera feed to web interface.
Uses open-source script for recording, timelapses, and auto-pausing failed prints.
Filament Runout Sensor:
Encoder + limit switch to detect filament presence and extrusion rate.
Mounted on back panel above electronics bay.
Semi-Custom RGB Panels & Hinges:
Replaced failed 3D-printed hinges with reinforced design using longer heat-set inserts.
Added protective door clips and smoked acrylic panel with RGB diffuser for camera visibility.
Copied hinge modification to back door for easier access.
Mini12864 V2.0 Screen Mount:
Replaced small stock screen with larger programmable LCD.
Designed 3D-printed mount under front door.
Electronics DIN Rail Mount:
New motherboard didn’t fit stock plate.
Designed 3D-printed DIN rail mounts for flexible motherboard installation inside frame.
Back Door Modification:
Built rear electronics bay door with hinges for quick access.
Integrated Noctua cooling fan and mini printed frame.
Result:
Finished Voron build exceeded typical speeds, with improved flow rate and print reliability.
Custom mods addressed airflow, thermal safety, usability, and serviceability.
The printer now combines Voron’s ethos of DIY uniqueness with a set of tailored performance upgrades, making it both a high-speed and highly functional machine.
Computers and Software
AI Chatbot
Click the photo to find out more!


Problem:
I wanted to explore how to run a large language model locally without internet access, so the AI could process input and generate responses entirely offline. At first I didn’t know what I would use this project for, but it was a good way to practice Python and integrate different tools.
Method:
Downloading the Model & Setup:
Chose DeepSeek as the LLM because it’s open source and easy to run locally.
Installed via Ollama.
Installed Python + pip, and added the libraries:
requests (HTTP requests)
pyttsx3 (text-to-speech)
PyAudio (audio input/output)
SpeechRecognition (voice-to-text)
json (data handling)
These allowed the AI to listen, understand, and speak back.
Creating Code for the Model:
Wrote first Python script: chatbot loaded and responded to the text “hi.”
Basic interaction worked, but only one exchange at a time.
Testing the Model:
Wrote second script: similar to first, but added text-to-speech output.
AI responded to “hi” and produced an audio file that played automatically.
Talking to the Model:
Expanded script to add speech recognition.
This let me speak to the AI directly and hear it reply.
Difficult step, but enabled full voice interaction.
Adding Wake Word & Kill Switch:
Added a wake word so the AI only listens when triggered (prevents it from responding to background sounds).
Added “end chat” command to return it to wake word listening mode.
Accidentally created a kill switch while testing, which turned into a useful feature to stop the program entirely.
Result:
Completed a fully offline voice chatbot using DeepSeek + Ollama.
System can:
Wake on command
Recognize speech input
Generate a response with the local LLM
Speak the response back with TTS
Return to listening mode or shut down on command
A personal milestone project—my first major Python build—that proved I could integrate AI, audio, and interaction locally without relying on internet servers.
2012 Mac Pro Restoration


Click the photo to find out more!
Problem:
I inherited an old 2012 Mac Pro that was outdated and too slow for its original use. Instead of retiring it, I wanted to restore and modernize the machine—maxing out its hardware and turning it into a triple-boot workstation for tinkering with different operating systems, programming, and school work.
Method:
Physical Modifications:
Cleaned and dusted the exterior and interior chassis.
Discovered it was already configured with dual CPUs, 8 RAM slots, and a GPU.
Reapplied thermal paste to refresh cooling.
Upgraded RAM by installing 8 × 16 GB DDR3 1333 MHz sticks → maxing out memory capacity.
Software Modifications:
Installed two new 256 GB SSDs alongside the existing two 512 GB Apple SSDs.
Wiped all four drives for a clean setup.
Used OpenCore-Patcher to bypass Apple’s software block and install macOS Sequoia on one Apple SSD (primary boot).
Configured second Apple SSD as a backup.
Used Boot Camp Assistant from Sequoia to install Windows 11 directly (no USB needed).
Installed Linux onto one of the new SSDs using Balena Etcher.
End result: macOS + Windows + Linux all locally available, each with its own dedicated SSD.
Result:
Successfully restored a 2012 Mac Pro into a triple-boot workstation.
Hardware maxed out (128 GB RAM) and given new life with SSD storage.
Runs macOS Sequoia, Windows 11, and Linux seamlessly.
Machine is now reliable for programming, experimenting with multiple operating systems, and daily school work.